
That being said, I'm absolutely in love with Adore Delano. She is one of my favorite, if not my favorite, drag queens. It doesn't hurt that I also love Danny Noriega when he's out of drag as well. Her makeup isn't as dramatic as a lot of other queens, but it's so on point. Between her hair, face, and style, Adore is basically who I aspire to be.
When you're in drag/costume makeup, you have to serve some face. Watch her music videos. She's flawless. Anyway, this makeup is a LOT of fun to re-create. I also do an outfit re-creation at the end of this tutorial as well!


Tutorial after the jump!
1. Start off with a fully concealed and foundation..ed.. face. You want full coverage for this look because, well, the more the better! I actually don't have any full coverage foundations with me at my apartment, so I blended my Buxom foundation with two full coverage NYX concealers to create a perfect base.

2. Start contouring! Drag contour (or any stage or costume makeup contour) is obviously much more dramatic and exaggerated than typical contouring. I first start off by using a liquid concealer (or stick) in a much darker shade to add a base for the contour.
Add it in the typical places -- the hollows of your cheeks, along your hairline, and on your jaw line.

Blend it in! Try not to blend it out so much that you can't see it anymore. Remember.. this is dramatic! I used a damp "beauty blender" for this step, with a dabbing motion instead of a swiping motion.

3. Continue the contour. With an angled foundation/contouring brush, heavily apply a dark matte powder bronzer on top of the liquid contour -- I use Make Up For Ever bronzer. Keep it focused on the hollows of the cheeks, where Adore's contour is the strongest.

Add powder contour on your hairline and on the jaw line as well.

If you want a sharper, more defined contour, use a beauty blender or any damp makeup sponge to clean up the line at the bottom of the cheek contour.

4. Using a small shadow brush, apply the matte powder bronzer to the sides of the bridge of your nose, and down the tip to create a slim, defined nose. Adore definitely shadows her nose but it isn't extremely noticeable, so you don't have to go crazy with this step.


5. Brows!! This is a crucial step. You can see how much of a difference just doing the right brow makes. Adore's eyebrows are dark brown, very thick to very thin, and pretty straight across with a slight arch. I have much more naturally long and arched eyebrows, so I had to sort of tailor her brow look to suit mine. You can see that the brow I drew in does not match my natural brow at all -- but that's the fun of it all!
I actually used a dark brown Sonia Kashuk liquid eyeliner to do this step. Normally I would never do such a harsh looking brow, but of course, this is drag! Danny Noriega has very short brows -- basically just the part before the arch, and nothing after.. so he has the luxury of being able to draw in any type of eyebrow he wants. But if you're like me and have your brows shaped in a certain way already, it's okay to draw outside the lines!
To make sure the liner isn't going anywhere, and to keep your natural hairs in place, set them with a clear brow gel.


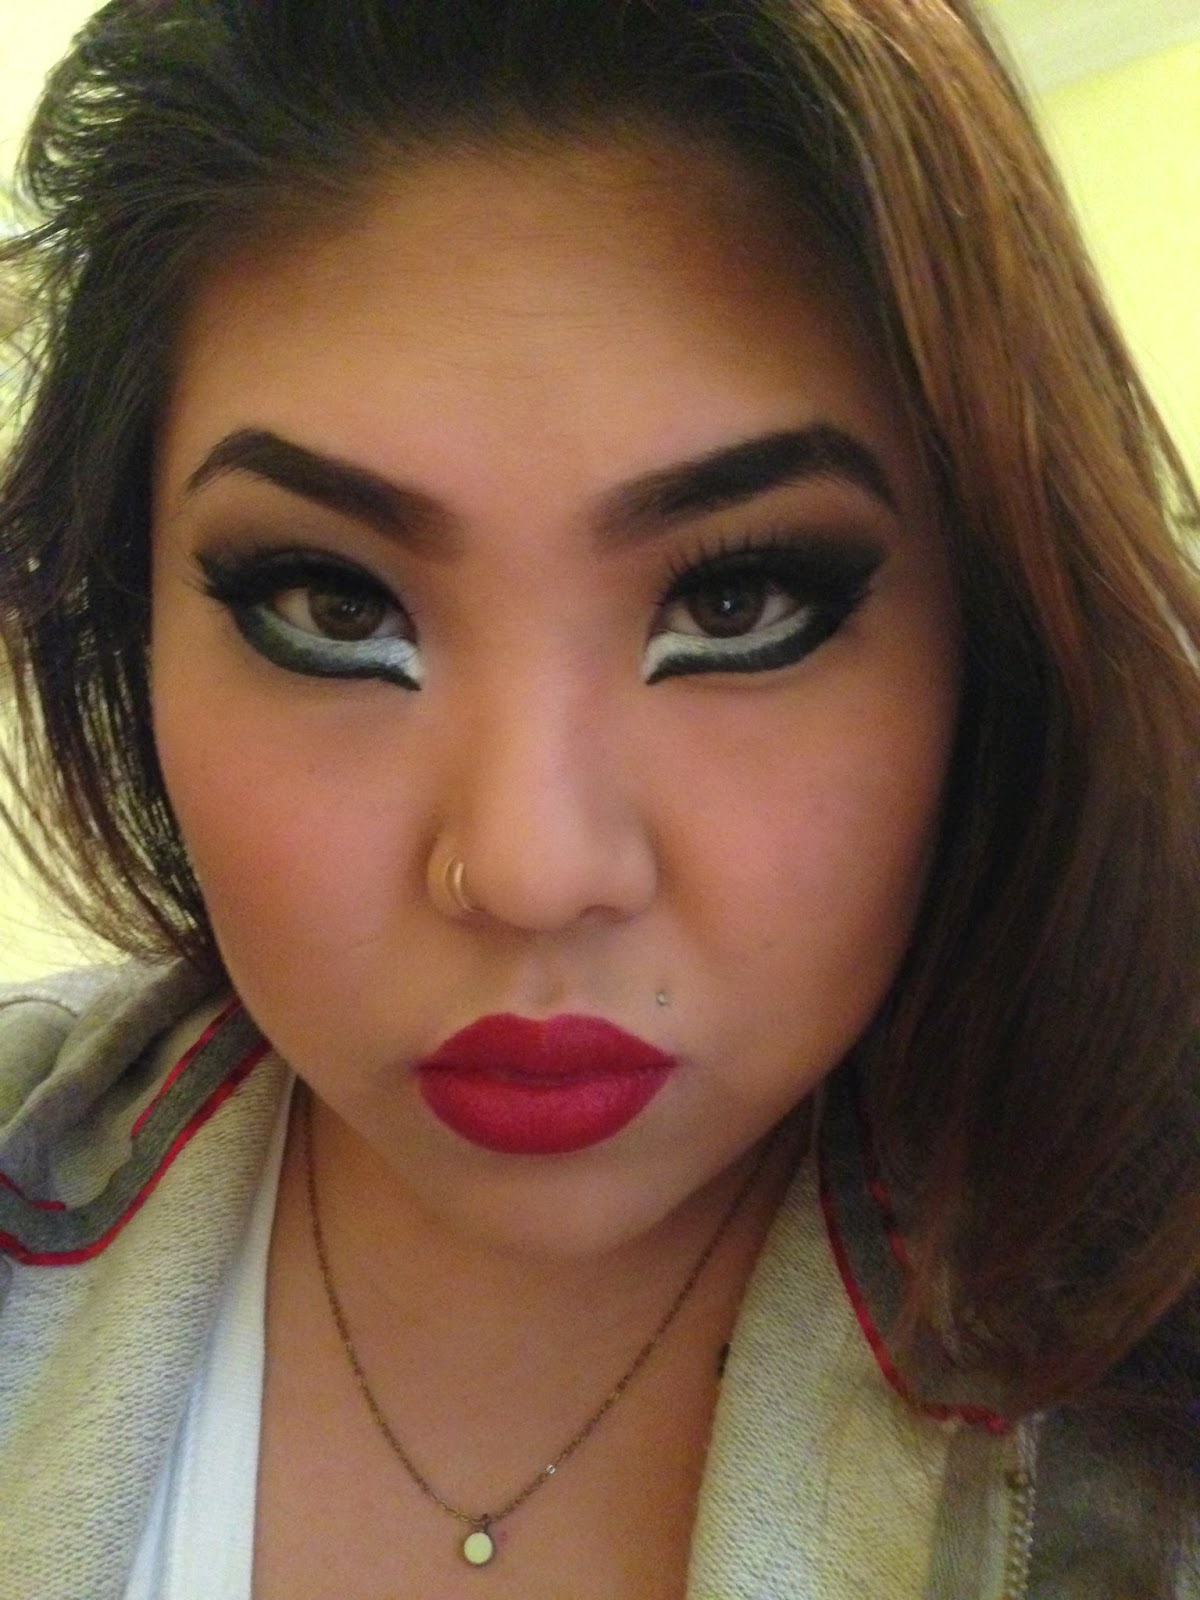
6. REALLY make sure to fully prime your lids before you apply any eye makeup. Then sweep a matte, taupe colored shadow over the entire lid (I used Urban Decay's "Naked 2" shadow) with a big fluffy brush.

7. Add a darker taupe/brown shade (like UD's "Faint") in the crease and blend it out! If you need to blend it out to get rid of any harsh lines, go back in with the big fluffy brush you used to apply the all-over light taupe color and buff the darker colors out.

8. Deepen up the crease and outer-V shape with a dark brown shadow (like UD's "Crave") using a smaller smudge or crease brush. It may seem unnatural, but with an angled shadow/eyeliner brush, extend the V-shape further than you normally would. It'll almost look like a cat eye created with shadow. Then, using the same liner brush, roughly "line" your lash line with the shadow.
And to be quite frank, the neatness of this step doesn't need to be on point, because it's Adore.. and Adore is always sort of messy, isn't she?


9. With a black liquid liner, draw a huge cat eye. Start from the inner corner of your eye, and draw the line very thin to very thick as you go towards the outer point. You'll be going over this line again, so don't worry if it's not perfect. But all things considered, try to be as neat as you can -- it's still liquid liner, after all.

10. Time for some signature Adore makeup! Using an opaque, white eyeliner, make a little triangle shape in the inner corner of your eye on the bottom lid, under the tear duct. Then extend the color and draw a pretty thick white line across the entire bottom lash line, and on the lower water line.

11. Following the white liner you just drew, trace along the bottom of the liner with the same black liquid liner from before. Start the line with a fine point near the tear duct (and right underneath the little white triangle shape), and end the line with a smaller cat eye flick underneath the original one in the outer corner.
You can also go over the top liner and build it up to suit your eye shape. Make it thicker for more drama!

12. Pop on some falsies. Make sure to use a dramatic pair for extra oomph! You can double up two sets for intense lashes if you wish! And add a coat or two of mascara to blend your natural lashes in with the falsies.

 |
| My left eye has two sets of lashes, my right eye has only one |
13. Apply a signature Adore matte red lipstick! Be sure to line your lips before you wear any dark shade like this, either with a clear or red liner. This will avoid staining your lips red and prevent any color from bleeding into lines around your mouth!
Adore's lips are large and in charge! And she has both a full upper and lower lip. Her cupid's bow is definitely there, but not very sharp or pronounced. If you weren't born with lips like Danny's, draw your lip liner around your actual lips, and fill in any gaps of skin between where you want your lips to be, and where your actual lips are. (In some looks, you can see that even Adore's lips are "drawn" on to be bigger than Danny's natural lips!)
To make my lips last all night, I first applied a matte red lipstick on top of my liner, then went over it with a creamy shade to gloss it up a bit.
And that's it! It seems much more complicated than it actually is, right? If you're going out to a show/club/bar/etc. with this much makeup on, I definitely recommend misting your face with a makeup setting spray so nothing budges all night.

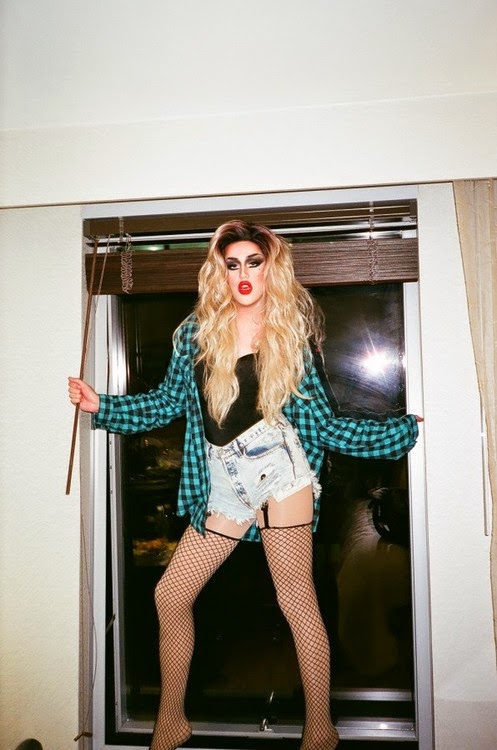
You can also go all out and wear an Adore-inspired outfit as well! Fortunately for me, Adore's style is extremely similar to my own, so I basically go out like this without even trying to replicate anything. Black bustier or body suit, some high waisted ripped jean shorts, and a big flannel button down. Or the same shorts with fishnets and an oversized muscle tee. Perfect Adore style!
Tease your hair, add a little black beauty mark underneath one one of your eyes.. and you're serving some Adore Delano realness.


Werk, werk, werk!
xojaybee
<33333
ReplyDeleteغسيل مجالس
ReplyDelete