Friday, June 27, 2014

DIY: "Chalkboard" + Pearls Mason Jar Makeup Brush Holder!

I don't know about you, but my makeup brushes can get a little out of control sometimes.  I have so many, and they're so skinny, it's hard to keep them organized.  I was in line at Jo Ann Fabrics last month and saw this adorable mason jar.. wait for it.. with a handle!  I wasn't sure what I was going to use it for at the time, but I knew I needed it.  (I have about 7 or 8 different types of mason and glass jars strewn about my room for various purposes, so I just added this to the collection!)

I was doing my makeup one morning and grabbing for one of my eyeshadow brushes -- which I kept in a little pocket of one of my acrylic makeup storage bins [see below at the very end for a photo of what I am talking about!] -- and realized how terribly they were stored.

And.. voila!  This idea was born.


I know a few other beauty bloggers and DIY-ers have made their own versions of these types of makeup brush holders, but I decided to create my own unique spin on the idea!

If you want to know how to create this adorable chalkboard and pearl makeup brush holder, read on!

-----------------------------------------


All I used was: a cheap, plain mason jar (mine happened to have the handle on it); cream colored chalkboard paint; a fine paint brush (any kind will do); a bunch of miscellaneous cream and white jewelry pearls; and a brown piece of chalk!

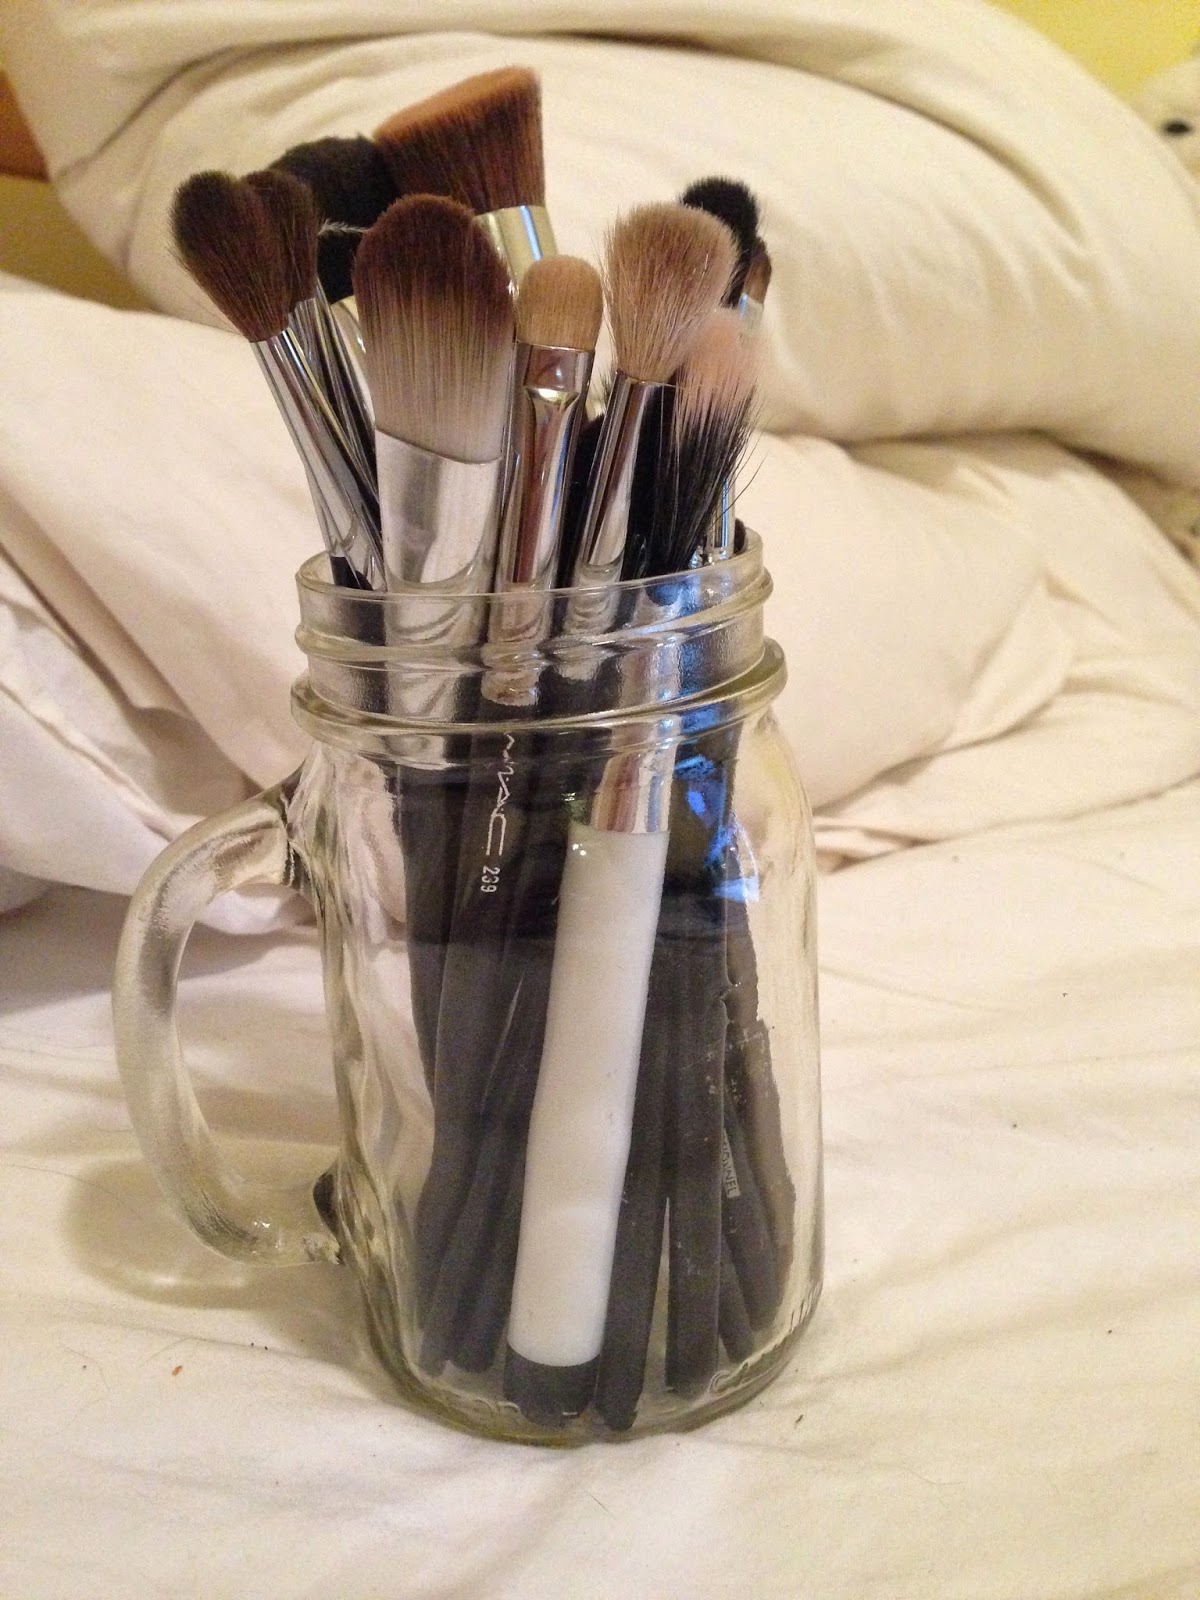
Start off with a basic jar big enough to hold however many makeup brushes you want to fit into the finished holder.  Put all the brushes into the jar before you modify it just to make sure it's the size you want!


Next, grab some chalkboard paint.  I got this at Jo Ann Fabrics, and you can pretty much pick it up now at any type of craft store out there.  I decided to go with an off-white color to match my room -- the brand I used called their shade "sheepskin."  But there are so many different colored chalkboard paints now!  At Jo Ann's, I saw pink, purple, blue, green, classic black.. you name it.  Use whatever color will match your room!  I also like this color because you can draw on it with any color chalk and decorate it to match any color palette.


Paint a square-ish block of the chalkboard paint onto the side of the jar.  I made mine sort of like a rectangle shape, but you could do anything!  A circle or a heart shape would look adorable on this makeup brush holder.  I chose to keep the edges of my paint rustic and brushed the paint itself onto the jar in a very purposely messy way.  If you want a super smooth application (the way chalk would write on a typical gradeschool-type chalkboard) I recommend using a sponge paint brush for a very even coating of paint.  But since I wanted mine antiqued, I roughly brushed mine on to leave streaks.

I applied two coats of paint.  Depending on the type of paint you use, wait until each layer dries completely til you apply another coat!


Once the paint has dried completely, take a bunch of jewelry pearls and fill up the jar about half way.  I picked up a combination of sizes and creams/whites.  These are relatively inexpensive -- if you're lucky you can find them at the Dollar Tree!  But these pearls were only about $1.20 a pack from Jo Ann's.


Once you add the makeup brushes back into the jar, it should look something like this!  You can arrange them however you want, but I like the way it looks when you just sort of stick them all over in no type of order.


The last part is the fun part!  Using whatever color chalk you prefer, draw any design on the chalkboard paint!  Obviously, with my (lack of) color palette, I chose to use a chocolate-milk color chalk and drew a little heart.  I dabbled with the idea of writing "brushes" or "june" in cursive, but I liked how simplistic the heart looked on my desk.

[If you like the framed glitter letters on my vanity, check out my other DIYs!]


And if you don't like what you draw, wipe it off with a paper towel or tissue, and start again!  That's the beauty of chalkboard paint.

For the record, this is what my makeup storage on my desk looks like now!  Clearly this picture was taken before I added my pearls into my mason jar, but you get the idea!  This makeup is on the opposite side of my desk from what is pictured in the photo above.  All of my makeup brushes used to be crammed into those little acrylics containers on the very top.. which was extremely crammed and ineffective.  What a difference a little re-organization and craftiness can make!


------------------------------------------


This adorable little mason jar can be used as a makeup brush holder, but can be used for other things as well!  You can add pens and pencils into it on a computer desk, as a holder for any eyeliners/lipliners, as a jar for extra coins and change (if you don't fill it with pearls), or even a flower vase with some pretty artificial (or real!) flowers!  The possibilities are endless.

Get organized and make something cute at the same time.  It's affordable and fun to create, and since it's a "chalkboard," the look never needs to stay the same!

xojaybee

Wednesday, June 25, 2014

Anastasia Dip Brow Review + "Tutorial"

Oh my god, you guys, I finally bought the Anastasia Beverly Hills Dipbrow Pomade. It's incredible.  I still love my go-to brow routine using my Stila and Brow Wiz products, but this pomade is a one stop shop!

I picked up a brand new angled eyebrow brush from Sephora and started dipping.


All I need to do a full brow is this pomade and a brow gel (I used my Anastasia tinted brow gel) to top it off and keep all your hairs in place.  I bought the "Auburn" -- if you frequently switch between hair colors like I do (I go anywhere from jet black to dark blonde), buy/use the shade of brow products that matches the lightest your hair will be.  So for my hair at the moment, the Auburn shade works perfectly.


The formula of this product is awesome and so unique.  A little goes a long way!  All you need to do is dip the brush into the pot, wipe off any excess pomade on the side of the container, and draw on your brows.  It's so pigmented and dries to matte perfection.  And once it's dried, it's not going anywhere.  Rain, snow, sleet, hail -- it ain't budging.  I rubbed and rubbed the swatch on the back of my hand, and it still looked perfect.  (To remove it, use soap + warm water, or a makeup remover.)


Here's how I do my brows using Dipbrow:

First of all, forgive the terrible lighting! It was a cloudy today and this is all the natural light + my makeup light would do for me.

Secondly, I'm sorry I'm starting with an already done brow, but it's super simple to follow! [If anyone wants an actual step-by-step tutorial starting with a naked brow, comment below!] 

 All I do is start at the very bottom of my brow (or rather, where my brow would be, if I grew hairs there).  Using an angled brow brush -- in the direction in the picture -- I draw a light line from the inner corner of my brow to the highest point of my arch.


I then fill in the tail portion of my brow, making sure to take advantage of the shape of the brow brush.  I create a thick-to-thin point and fill in up to the top of the arch.


Then, I rotate the brush so it's perpendicular to my brow, and fill in all the gaps.  I'm especially light handed at the inner-corner of the brow, so I don't look too harsh or "mean."  I try not to fill in much on the top of the brow, so my natural "hairline," if you will, still peeks through.  A lot of people don't like this look, but I like how it still looks more like my own eyebrow and not as much of a "stencil" look.


If you're going for a more dramatic look, you can take a concealer brush with some foundation and clean up around the edges, creating a very sharp line around your brow.  But for a more natural, day-to-day look, I prefer leaving it a little softer overall.


-----------------------------------------------

Overall, I couldn't be happier with Dipbrow.  I'm so glad I finally sold my soul to this new cult favorite.  Now I see why it's so popular!  I mean, with a 4.7 out of 5 star rating on the Sephora website, its popularity precedes it.  And, having used it for about a week straight, I can tell it is going to last me quite a while.  I have virtually nothing bad to say about it!

Another win for me from Anastasia Beverly Hills!

xojaybee

Tuesday, June 24, 2014

Chicago Pride Weekend Pt.I Shenanigans!

Again, I'm sorry I have been so busy with this crazy summer of mine, but I wanted to check in!  Chicago Pride Weekend Part Uno was this past weekend, and it could not have been more fun!

Here's what I wore:


I just paired a black romper (which I got from Target years ago) with a mint green chiffon kimono from H&M, a fun leather and gold necklace from Forever21, and tan cut-out booties from UrbanOG.  

TIP:  I'm all about looking good and feeling great -- but if you know you're going to something like Pride, or a big festival of some sort, I don't recommend wearing anything that you'd regret if it got ruined!  Cigarette burns, spilled drinks, glitter, paint, and dirty streets are all definite possibilities.. so plan accordingly!  I actually got caught up in a torrential downpour in this outfit with no shelter for 15 minutes or so, but because I didn't wear anything expensive or ruin-able, it didn't matter!

Here's the makeup that I did:


Since this past weekend was only the festival, I didn't go super crazy all out for my makeup look.  Just a simple gradient shadow, winged liner, and natural falsies!  An adorable older man commented that I looked like Gia Gunn -- one of my favorite drag queens -- which is a huge compliment!  Coincidentally, she performed at the festival that weekend at a drag show the next day.  Queens know how to beat their face to gawd, so being compared to one made me smile.

A photo I took of Gia performing at the festival!

It was a hot and humid day, so I definitely made sure to prime my face and spritz it with some setting spray before heading out the door.  And, as I mentioned earlier, I got caught in a flash flood.. and my makeup DID. NOT. BUDGE.  I swear.  It's the benefit of using all waterproof makeup and a great setting spray! 

And here are some fun pics of my lovely friends and me:


The festival was filled with fabulosity, colors galore, chiffon and tulle, glitter glitter glitter, body-ody-ody, and so much more.  You can be whoever, wear whatever, and do anything your heart desires without the fear of being judged or ridiculed.  It's one of the most amazing environments to be in.

It was an amazing weekend, but Pride Part.II next weekend will be even more fantastic!  There will be neon, glitter, rainbows, and more glitter -- and you know I'll document everything from my outfit to my hair to my makeup to my accessories.  And I'm walking in the Pride Parade with one of my wonderful friends, so I'll be sure to take a ton of photos :]

xojaybee


Monday, June 23, 2014

Original Naked Palette

Okay.  I caved.  I finally bought the original Urban Decay Naked Palette.  I told myself I would never indulge in any of the Naked's, but the temptation finally got to me!  I know I'm probably one of the last people to hop on this bandwagon, especially for someone who owns as much makeup as I do.  But it finally happened.. so I have to accept it and embrace it.

I'm sure that a lot of you are familiar with this palette, so I won't go into too much detail.  But I still thought I'd write a review of it for those who don't own it yet, or anyone who just wants my opinion about the shadows!


A lot of people complain about the packaging of this palette.  I honestly don't see too much of a problem with it.  Yeah, it doesn't snap close, so it's a little difficult for travel.  But what are you doing with it, putting it in your suitcase and throwing it down the stairs?  If you keep it in a makeup bag/purse/carry-on/etc., I see very little issues with the packaging.


I'm obviously a huge neutrals fan, so these shades are right up my alley.  In fact, I already own "Half Baked," "Buck," and "Gunmetal" as individual shadows.  


How gorgeous are these shades?!  I sampled a few of them in Sephora, because I couldn't decide whether to pick up the original Naked Palette or the Naked 2 (which I also love).  I went with the original Naked, mostly because I know I'm going to use this palette's lighter shaded neutrals for every day wear.  The Original Naked has more of a warm, gold tone overall, whereas the Naked 2 is a bit more cool and grey-ish.


Above are swatches of the shadows over UD's Primer Potion.  From top to bottom: Virgin, Sin, Naked, Sidecar, Buck, Half Baked, Smog, Darkhorse, Toasted, Hustle, Creep, and Gunmetal.  

There are only two matte shades in this palette: Naked and Buck.  Naked may look almost invisible, but a lot of that is due to the fact that it blends in so perfectly with my tanned skin color.  It is THE perfect blending shade to sweep all over the lid before a look, or as a transition shade between a crease color and a lid color.  And I use Buck in almost every matte neutral eye look I create!  It's a great soft brown color to use between a lighter inner corner shade and a black or dark brown crease/outer-V shade.

My favorite shades in the palette are definitely Smog and Darkhorse.  Absolutely gorgeous.  I created the gradient/ombre look in the photo below using only Half Baked on the inner third of my lid, Smog in the center, and Darkhorse on the outer third.  This type of gradient look is one of the easiest yet most impressive-looking things to do with eyeshadows!


I love Sidecar, Toasted, and Hustle for creating a smokier, rose-gold colored eye look.  And any of the shades from the left side of the palette can be combined for an ethereal, shimmery daytime look.


This is what the shadows look like without a primer applied underneath.  Much less pigmented, yet still extremely pretty.  They're almost even more wearable for daytime looks when soft and diffused like this!

I think I've used at least one, if not more, shades from this palette every day since I've purchased it.  I know it can be a bit pricey, but if you think about it: UD single shadows are $18 a piece for .05oz, and at $54 for 12 shadows that are also .05oz.. you'd be spending $216!  That's a steal if I've ever seen one.  Do yourself a favor and pick this up now if you haven't already.  Now I know what I've been missing for the last three years!

Maybe it's time to go buy Naked 2 and 3?

xojaybee

Monday, June 16, 2014

Spring Awakening Music Festival hiatus

Whew!  I've been one busy individual lately.  Here is just a taste of what the last three days in Chicago had in store for me!

Spring Awakening Music Festival was, yet again, a fantastic time.  It's crazy, loud, expensive, and so worth every second and penny spent.  

Also, I'll be putting up a tutorial for this summer music festival makeup look I created for my SAMF adventures.  5+ hours in the heat and sun, transitioning into hours of after dark partying.  Then waking up and doing it all over again!  Makeup for outdoor fests needs to be fun, eye catching, versatile, and long-wearing.  And the glitterier the better!

Anyway, I'm sorry about the long delay in posting -- this summer has been a whirlwind, and it's only one month in!  Look out for new posts soon :]

All glitter everything!


xojaybee

Monday, June 9, 2014

Adore Delano Makeup Tutorial! :D

Okay so let me first start off by saying this is not going to be a makeup tutorial for everyone.  This is definitely not a "day time" look.. nor is it really a typical "night time" look either.  Yes, I -- and you -- can totally wear it when you go out at night, no problemo.  But it's a very specific look, obviously, that is more costume-y than anything.

That being said, I'm absolutely in love with Adore Delano.  She is one of my favorite, if not my favorite, drag queens.  It doesn't hurt that I also love Danny Noriega when he's out of drag as well.  Her makeup isn't as dramatic as a lot of other queens, but it's so on point.  Between her hair, face, and style, Adore is basically who I aspire to be.

When you're in drag/costume makeup, you have to serve some face.  Watch her music videos.  She's flawless.  Anyway, this makeup is a LOT of fun to re-create.  I also do an outfit re-creation at the end of this tutorial as well!


Tutorial after the jump!