So the longer I am alive, the more in love with drag I become.
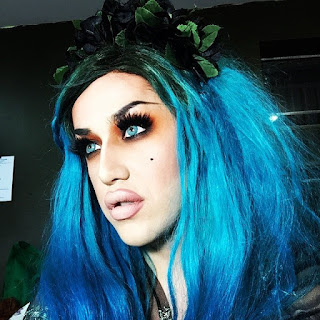
Although Pearl Liaison has slowly risen to the top of my list, the first queen I ever fell in love with is Adore Delano, of course. I already have an Adore makeup tutorial up on my blog, which is her signature makeup look. But I saw this photo on her Instagram and had to stop what I was doing to screen shot it. It is seriously STUNNING. I know that she is wearing those blue contacts and obviously the blue weave.. but I still had to recreate it the best I could.
It's one of the most striking makeup looks I've seen in a while. And yes.. it's really, really dramatic. Most people probably wouldn't wear this makeup during the day, and it is even a little intimidating for every day night-time wear as well. So I toned it down a bit -- not a lot, but a bit -- to make it more wearable. I swapped out that gorgeous orange shadow for a more muted caramel shade, and used much less dramatic lashes. But everything else is virtually the same!
The key to this look is BLENDING, BLENDING, BLENDING. The blending creates so much dimension on your eye, and really makes it smokey and gorgeous. AND I decided to recreate this look using only drugstore and inexpensive products, to show how beautiful "cheap" makeup can be!
Read on for the tutorial!
1.
Unfortunately I did do my brows using my typical Anastasia Brow Wiz, Dip Brow Pomade, and Brow Gel.. BUT I know that NYX has almost identical products (that you can get at Ulta and CVS I believe).
I'm a big fan of natural looking skin. I don't like super flawless skin for every day. It looks too fake and crazy, in my opinion. Anyway, for my foundation I used Maybelline Fit Me Matte + Poreless Powder Foundation in "Sun Beige" all over my face, just for some natural coverage. It comes with a little sponge, but I used a flat top kabuki brush from Coastal Scents. I especially like this type of foundation for the summer, because I try to stay as matte as possible.
I did prime my skin using some moisturizer mixed with Becca Bronzing Skin Perfector, which is obviously not a drugstore brand, but it's totally optional. I like to have a layer of bronzer or illuminator underneath a matte foundation, just so a little dewey-ness comes through.
2.
Of course, priming is essential for this type of dramatic eyeshadow look. I applied NYX Eyeshadow Base in "Skin Tone" all over my lid.. and I mean all over my lid. I applied the base from the base of my nose to the outer portion of my lid where my eyebrow ends, from the lashline to where my eyebrow begins.
Then, although this seems like a dumb step, with a big fluffy eyeshadow brush I swept a skin colored shadow over top where I applied the base. For me, Makeup Geek Eyeshadow in "Beaches & Cream" is the perfect color.
Just for my sake, I mapped out where my crease would be (or if you actually have a crease, where your crease is) with a sand colored eyeshadow using a fluffy crease brush. I actually went a bit over the natural crease. If you don't have a lot of lid space, just go with the crease and skip going higher. I used Makeup Geek Eyeshadow in "Creme Brulee".
4.
For a base on my mobile lid (the part of the lid between your crease and your lashline), I smudged NYX Jumbo Eye Pencil in "French Fries", which is a pretty deep brown shimmery pencil. This dries sort of quickly, so as soon as you apply it, use your finger and smudge it all over the lid.
5.
From the lashline to the crease, sweep a deeper caramel-colored shadow where you applied the shadow base. Morphe Brushes Shadow in "Caramalized" is one of my favorite shadows recently, and works perfectly for this look. Plus.. it's less than $2.50. Take it up and into the crease where you mapped out the crease with the sand color. You can use a fluffy shadow brush for this step as long as it is quite dense. If not, use a flat shader brush.
6.
This is the weird part, but stick with me. With that caramel colored shadow, sweep it all over your bottom lid, from outer to inner corner. Connect it with the top shadow so it sort of makes a big eyeshadow ring around your entire eye with one color.
Yes, it'll look like you either have a week-old black eye or haven't slept in 5 days.. but trust me on this one. Trust the process. Trust the eyeshadow gods.
With a deep, cocoa colored shadow, go over just the mobile lid from inner to outer corner. You'll be covering up some of the caramel color, but it still shines through and creates a lot of depth. I used Makeup Geek Eyeshadow in "Cocoa Bear" which is one of my go-to colors, and applied using a dense fluffy shadow brush.
Using a black kajal eyeliner, go a little crazy and line your top and bottom lids with a super thick line. I used Maybelline Master Kajal Liner in "Onxy Black" for this -- I especially recommend using kajal because of its smokey and creamy properties. If you've never used a kajal liner, definitely try it. It'll change the way you apply smokey eyes!
Don't worry about creating any sort of crisp lines here. I mean.. don't draw like a toddler all over your eye, but it doesn't have to be "neat" by eyeliner standards. We're going over it soon with some eyeshadow.
With a super dark black eyeshadow, pack it on top of the liner and really smoke it out, on both the top and bottom lids. Morphe Brushes Shadow in "Coal" is some of the blackest I own. I used a tiny flat shader brush for this step. I wouldn't recommend using a fluffy brush for this, as we're trying to get as much shadow on top of the liner as possible.
And again, we're going to be really blending this out, so don't worry about making the black shadow super neat and/or clean. You'll just be wasting your time!
Here's where the fun parts start, at least for me. With a shadow blending brush or a dense crease brush, take the deep cocoa colored shadow and diffuse the line between where the black and brown shadows meet. Using a "windshield wiper" motion, go back and forth and back and forth until that color is like a seamless gradient. Go from inner to outer corner, and make sure to really connect the top and bottom lids with the blending.
11.
Make sure you REALLY blend and smoke out that bottom lid/lashline. Do the exact same blending technique with the bottom lid. It'll still look sort of scary, but don't be scared to really take that color far down your lid!
12.
Using the caramel-colored shadow, now blend the cocoa colored shadow with the caramel color you already laid down earlier on your lid. Blend between those two colors until those colors create a seamless gradient. This step can take a few minutes, so really be patient with it. Blend and blend and blend (I think I went over my shadow around 100 times just to make it super-diffused!!).
12.
Add a crap-ton of mascara and fluffy false lashes, and you're done with the eyes! I did about three coats on my bottom lashes, and two on my top after I applied my falsies. I've really been loving Maybelline Volum'Express The Rocket Waterproof Mascara in "Very Black" for dramatic, night looks. (I am obsessed with the same mascara in "Brownish Black" for daytime wear.)
I didn't think this look needed any brow-bone highlight or inner-corner highlight, mostly because it's an all matte look that is pretty dramatic enough on its own, but also because Adore didn't use any from what I can tell from her photo.
As for the rest of the face, I kept things super simple and matte. I definitely didn't do as nude of a lip as Adore, so I swiped on some CoverGirl Colorlicious Lipstick in "Champagne" for a nude lip that still has some natural pinky undertones.
I did the subtlest of contouring/bronzing with NYX Matte Bronzer in "Light" just for a hint of color. Adore barely had any contouring, and no highlighting, so I tried to recreate this matte look as best as possible. I actually agree with her decision though, because by keeping the rest of the face super neutral and almost a little boring, the emphasis is rightly all on the eyes.
And.. that's it!
I obviously have colored contacts (or.. maybe not so obviously?), but I think the way this eye look makes my eye color pop is ridiculous. Any sort of hazel or lighter colored eye will look phenomenal in a warm, smoked out look like this.


If you are looking for a reputable contextual ad network, I suggest that you try Propeller Ads.
ReplyDeleteDo you need free Instagram Likes?
ReplyDeleteDid you know that you can get them AUTOMATICALLY AND ABSOLUTELY FOR FREE by registering on Like 4 Like?